Welcome to the Passio Nutrition-AI Android SDK!

Visit our web page for more information on our AI products
What this codelab will show you:
- How to add the SDK library into your Android Studio project
- How to add the neural network models and files that power the SDK and initialize the SDK accordingly
- How to create a recognition session to scan raw and branded foods
- How to use the Passio Nutrition Database to retrieve the data of the scanned foods
What you need:
- Recommended usage of Android Studio 4.1+.
- Access to the Android-Passio-SDK-Distribution GitHub repository
- License key generated by our Mobile Engineering team
- A test device with Android 5.0+
Passio Android SDK is shipped in a form of an .aar file. Following these steps will grant you access to the SDK API.
Download the .aar from our distribution repository
- Visit the releases page of our Android-Passio-SDK-Distribution GitHub repository. Download the passiolib-release.aar file from the latest release.
- If you don't have access to the repository please contact our Android engineer at marin@passiolife.com
Include the .aar to your Android Studio project
In Android Studio, go to File -> New -> New Module -> Import .JAR/.AAR Package.
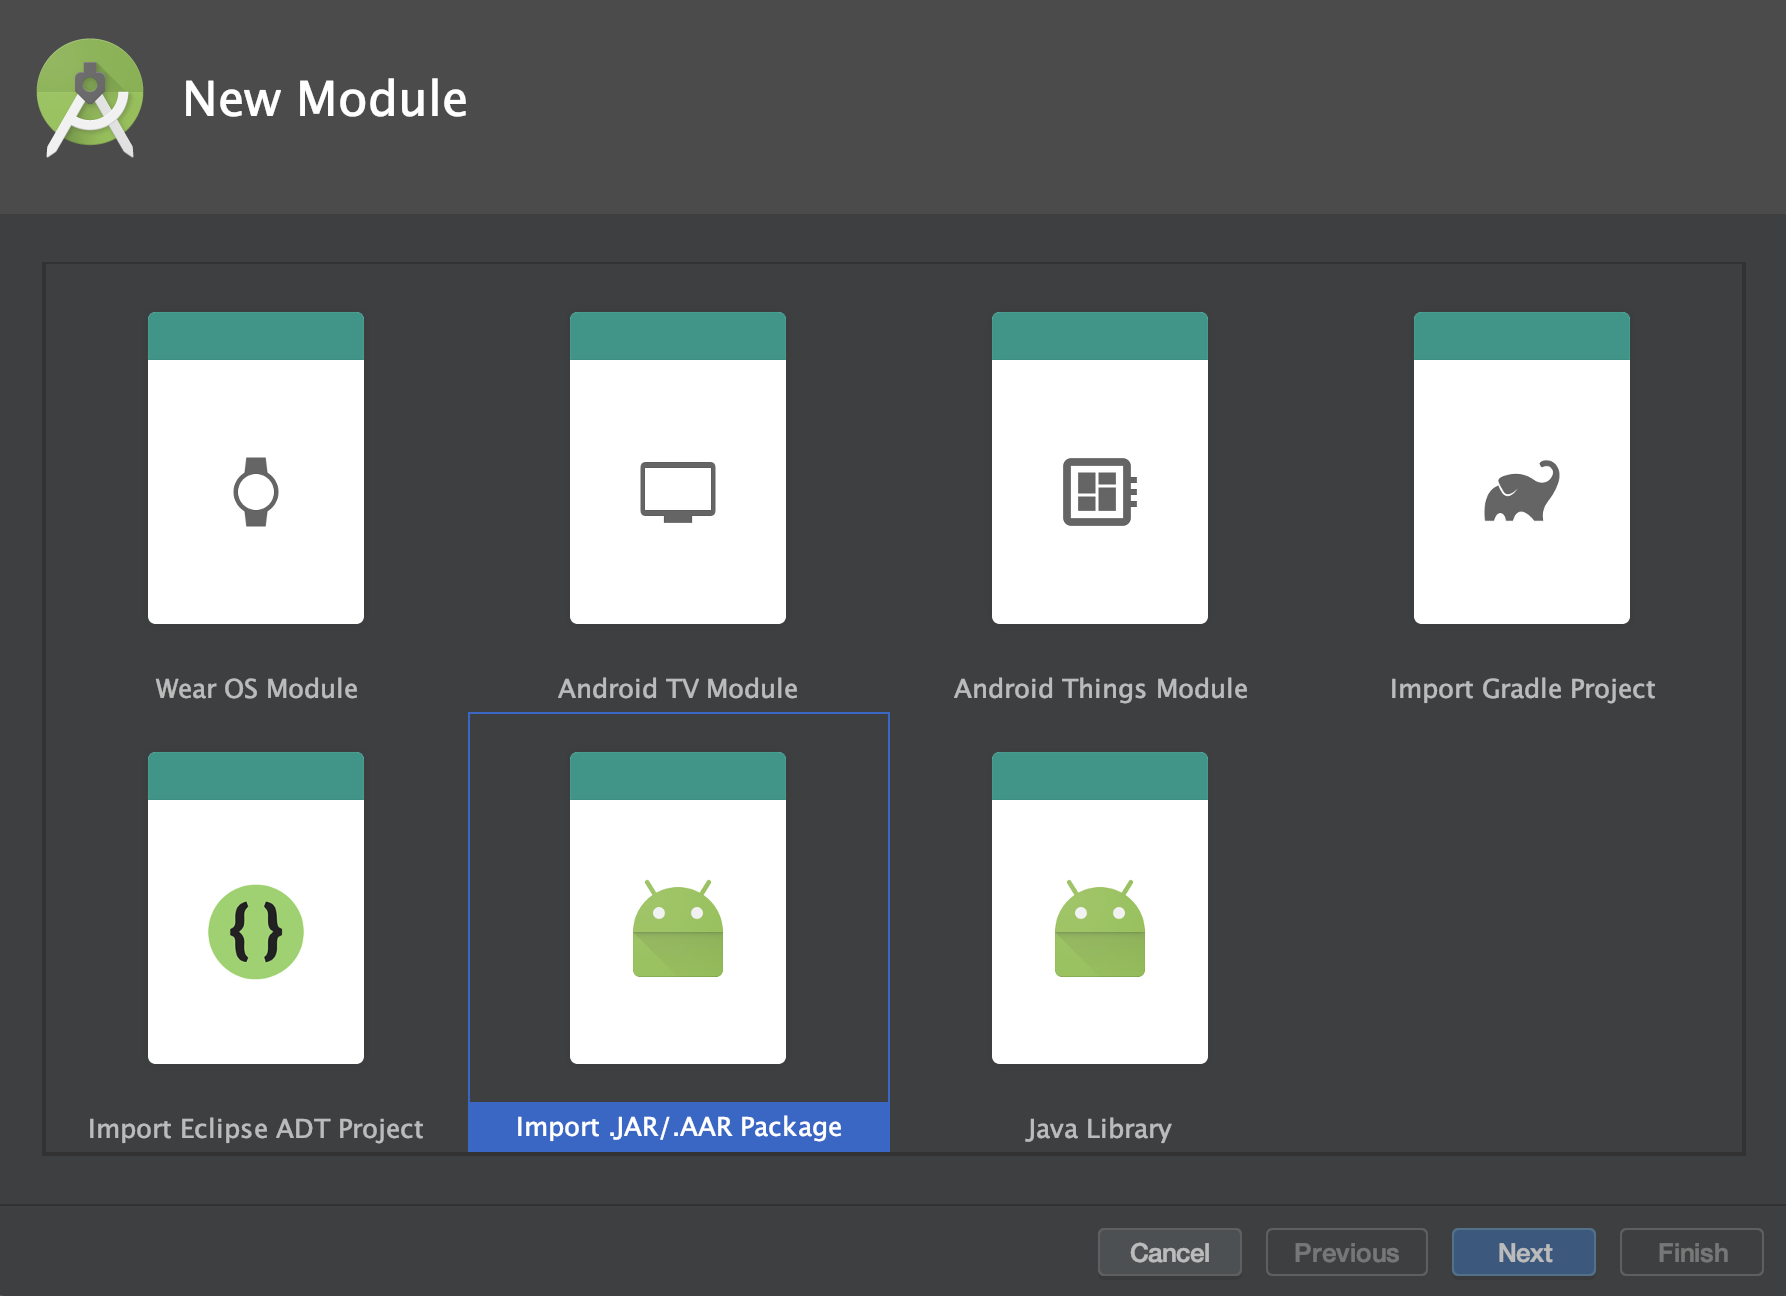
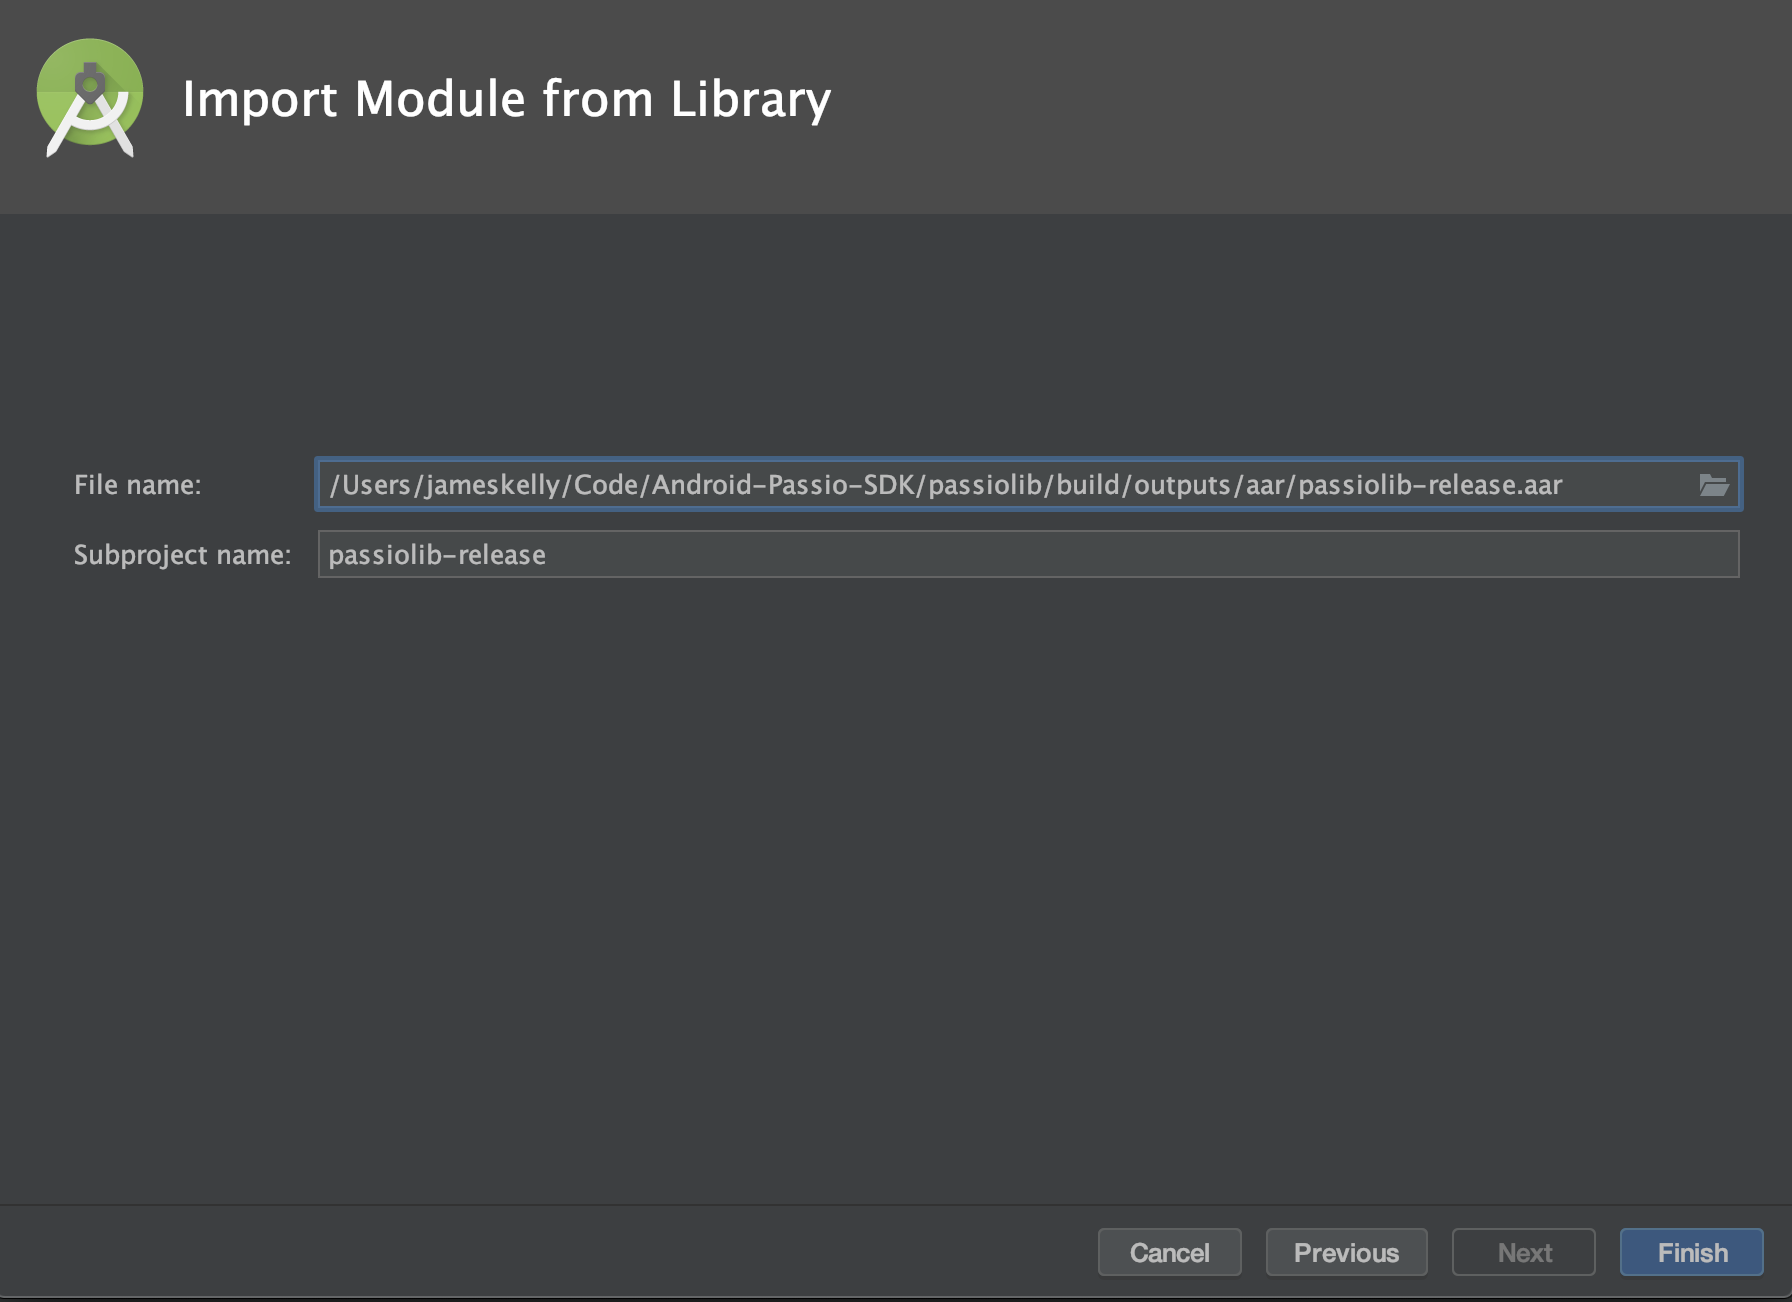
Specify the location of the downloaded .aar file
Finally, add the dependency to the newly created module from the module where you would like to use the Passio SDK. This example shows how to add the dependency to your app module by updating the build.gradle file
dependencies {
    implementation project(':passiolib-release')
}
Dependencies
Passio Android SDK is powered by TensorFlow and FirebaseVision with the camera being managed by CameraX. Add the dependencies to these three project by adding these lines to the chosen build.gradle file
dependencies {
    // TensorFlow
    implementation ('org.tensorflow:tensorflow-lite:0.0.0-nightly') { changing = true }
    // CameraX
    def camerax_version = "1.0.0-beta12"
    implementation "androidx.camera:camera-core:$camerax_version"
    implementation "androidx.camera:camera-camera2:$camerax_version"
    implementation "androidx.camera:camera-lifecycle:$camerax_version"
    implementation "androidx.camera:camera-view:1.0.0-alpha19"
    implementation "androidx.camera:camera-extensions:1.0.0-alpha16"
    // Google Vision
    implementation 'com.google.android.gms:play-services-mlkit-text-recognition:16.1.1'
    implementation 'com.google.android.gms:play-services-mlkit-barcode-scanning:16.1.3'
}
In order for the SDK to work add the following lines to the android section of your chosen build.gradle file
android {
    aaptOptions {
        noCompress "passiosecure"
    }
    compileOptions {
        sourceCompatibility JavaVersion.VERSION_1_8
        targetCompatibility JavaVersion.VERSION_1_8
    }
}
Running the "Sync Project with Gradle files" will enable you the access to code of the SDK
To start using the camera in your Activity/Fragment, implement the PassioCameraViewProvider interface. By implementing this interface the SDK will use that component as the lifecycle owner of the camera (when that component calls onPause() the camera will stop) and also will provide the Context in order for the camera to start. Also, the component implementing the interface must have a PreviewView in its view hierarchy.
Start by adding the PreviewView to your view hierarchy. Go to your layout.xml and add the following
 <androidx.camera.view.PreviewView
    android:id="@+id/myPreviewView"
    android:layout_width="match_parent"
    android:layout_height="match_parent" />
The SDK requires the device's Camera to work. To ensure that the Camera is working and sending frames to analyze, you need the user's permission to access the camera. As of now, only the back camera is supported by the SDK. There are two ways to implement Camera usage along with the permission request. Review both of these strategies and choose what best suits your code.
1. Using the PassioCameraFragment
PassioCameraFragment is an abstract class that handles Camera permission at runtime as well as starting the Camera process of the SDK. To use the PassioCameraFragment simply extend it in your own fragment and supply the PreviewView that has been added to the view hierarchy in the previous step.
class MyFragment : PassioCameraFragment() {

    override fun getPreviewView(): PreviewView {
		return myPreviewView
	}

    override fun onCameraReady() {
    	// Proceeded with initialzing the recognition session
    }

    override fun onCameraPermissionDenied() {
    	// Explain to the user that the camera is needed for this feature to work and ask the permission again
    }
}
2. Using the PassioCameraViewProvider
This approach is more manual but gives you more flexibility. You need to implement the PassioCameraViewProvider interface add supply the needed LifecycleOwner, Context and the PreviewView added in the initial step.
class MainActivity : AppCompatActivity(), PassioCameraViewProvider {

    override fun requestCameraLifecycleOwner(): LifecycleOwner {
        return this
    }

    override fun requestContext(): Context {
        return this
    }

    override fun requestPreviewView(): PreviewView {
        return myPreviewView
    }
}
Acquire the user's permission to use the Camera with these steps
Finally, after the user has granted the permission to use the camera, start the camera of the SDK
PassioSDK.instance.startCamera(this /*reference to the PassioCameraViewProvider*/)
Run the code to make sure that the preview is working
Two things are required for the SDK to work: a proper license key and the neural network files that the SDK uses to run the recognition process.
- The license key can be requsted at support@passiolife.com
- The files are shipped inside the PassioSDKSandbox project on the releases page of the Android-Passio-SDK-Distribution repository. Unzip the PassioSDKSandbox project and locate the files in the assets folder: /PassioSDKSandbox/app/src/main/assets. Files that the SDK needs have an extension .passiosecure and are encrypted
There are several ways to initialize the SDK depending on the location of the needed files:
- Files are in the assets folder of your Android project
- Host the files on your own server and point the SDK to the URL of the hosting folder
- Host the files on your own server, download the files, store them on the device's memory and point the SDK to the URIs of the needed files
- Let the SDK manage file download and update
1. Files are located in the Assets folder
- If the assets folder is not already present in your Android project, create one in the module where the SDK dependencies are located under the main directory (e.g. app/src/main/assets)
- Transfer the .passiosecure files to the assets folder
- Create a PassioConfiguration object with the application context and the license key
- Call the configure method of the PassioSDK without changing the default PassioConfiguration object
val passioConfiguration = PassioConfiguration(
    this.applicationContext,
    "Your license key here"
)

PassioSDK.instance.configure(passioConfiguration) { passioStatus ->
    // Handle PassioStatus states
}
How to handle the configure callback will be explained on the bottom of the section.
2. Pass the URL of the folder containing the files
For this approach you will need to host the files on your own server and under one directory. Pass the URL to the PassioConfiguration object using the customURL field.
val passioConfiguration = PassioConfiguration(
    this.applicationContext,
    "Your license key here"
).apply {
    customURL = "Provide the url here"
}

PassioSDK.instance.configure(passioConfiguration) { passioStatus ->
    // Handle PassioStatus states
}
To track the download process you can implement a PassioDownloadListener (recommended to define after the PassioStatus mode returns IS_AUTO_UPDATING)
PassioSDK.instance.setDownloadListener(object : PassioDownloadListener {
    override fun onCompletedDownloadingAllFiles(fileUris: List<Uri>) { }
    override fun onCompletedDownloadingFile(fileUri: Uri, filesLeft: Int) { }
    override fun onDownloadError(message: String) { }
})
3. File are located on the memory of the device
This approach is recommended if you are responsible for the download of the files. In this case the SDK does not care where the files are hosted and how they are downloaded, just where they are stored after the download has completed. Use the PassioConfiguration object to modify the initialization process with local files and pass the URIs of the files to the localFiles field.
val passioConfiguration = PassioConfiguration(
    this.applicationContext,
    "Your license key here"
).apply {
    localFiles = /*List of files URIs*/
}

PassioSDK.instance.configure(passioConfiguration) { passioStatus ->
    // Handle PassioStatus states
}
4. The SDK will manage the download and updates
By setting the autoUpdate field to true the SDK will do the initial download of the files and will try to update them every 2 weeks.
val passioConfiguration = PassioConfiguration(
    this.applicationContext,
    "Your license key here"
).apply {
    autoUpdate = true
}

PassioSDK.instance.configure(passioConfiguration) { passioStatus ->
    // Handle PassioStatus states
}
Handle the configuration response
When you call the configure method of the Passio SDK with the PassioConfiguration object, you will need to define a callback to handle the result of the configuration process. This result is comprised in the PassioStatus object.
class PassioStatus {
    var mode: PassioMode = PassioMode.NOT_READY
    var missingFiles: List<FileName>? = null
    var debugMessage: String? = null
    var activeModels: Int? = null
}
The mode of the PassioStatus defines what is the current status of the configuration process. There are 5 different modes, and they all should be handled by the implementing side.
enum class PassioMode {
    NOT_READY,
    IS_BEING_CONFIGURED,
    IS_AUTO_UPDATING,
    IS_READY_FOR_NUTRITION,
    IS_READY_FOR_DETECTION
}
- NOT_READY -> The configuration process is done and the SDK is not ready for work or the SDK hasn't started the configuration process yet.
- IS_BEING_CONFIGURED -> The SDK is still in the configuration process. Normally, you shouldn't receive this mode as a callback to the configure method. If you do please contact our support team.
- IS_AUTO_UPDATING -> The files required by the SDK to work are not present and are currently being downloaded.
- IS_READY_FOR_NUTRITION -> The configuration process is over, but only the nutritional database is ready for use. Query the nutritional database is permitted, but the machine vision part of the SDK will not work. This mode is usually accompanied with missingFiles needed for the SDK to work completely.
- IS_READY_FOR_DETECTION -> The configuration process is over and all the SDKs functionalities are available.
The missingFiles contain a list of all the files missing for the SDK to work optimally. When this list is not null, this doesn't mean that the SDK is not operational. The SDK may be initialized with older files, but it will advocate the download of the newest files through this list.
The debugMessage usually gives more verbose and human-readable information about the configuration process. It will always give an error message if the mode is NOT_READY.
The activeModels will give the version of the files installed and ran by the SDK if the configuration process ran successfuly i.e. if the mode is IS_READY_FOR_DETECTION.
Best practices
- The PassioStatus mode is NOT_READY -> check debugMessage for the error, usually the wrong license key has been supplied or the files are missing.
- The PassioStatus mode is IS_AUTO_UPDATING -> register a PassioDownloadListener through the PassioSDK.instance.setDownloadListener() method as it will enable tracking of the download progress.
- The PassioStatus mode is IS_READY_FOR_NUTRITION -> check the missingFiles list to download the rest of the files needed for the SDK to be fully operational.
- The PassioStatus mode is IS_READY_FOR_DETECTION -> still check the missingFiles because the SDK might be running with an older version of the files and newer need to be downloaded.
Now that you have set up the camera and initialized the SDK, it is time to do your first food detection.
val options = FoodDetectionConfiguration().apply {
    detectBarcodes = true
}
To start the Food Recognition process a FoodRecognitionListener also has to be defined. The listener serves as a callback for all the different food detection processes defined by the DetectionOptions.
private val foodRecognitionListener = object : FoodRecognitionListener {
    override fun onRecognitionResults(
        candidates: FoodCandidates,
        image: Bitmap?,
        nutritionFacts: PassioNutritionFacts?
    ) {
        val detectedCandidates = candidates.detectedCandidates!!
        val barcodeCandidates = candidates.barcodeCandidates!!
        val passioID = detectedCandidates.first().passioID
        val foodName = PassioSDK.instance.lookupNameFor(passioID)
        Toast.makeText(requestContext(), foodName, Toast.LENGTH_SHORT).show()
    }
}
Using the listener and the detection options start the food detection by calling the startFoodDetection method of the SDK.
override fun onStart() {
    super.onStart()
    PassioSDK.instance.startFoodDetection(foodRecognitionListener, options)
}
Stop the food recognition on the onStop() lifecycle callback.
override fun onStop() {
    PassioSDK.instance.stopFoodDetection()
    super.onStop()
}
Try to run the code containing the foodListener defined above. Point the phone the image below and see if you are getting the correct food printed on the screen (it should be red apples, but if it isn't don't worry, we'll cover the data structure later).

When starting the food detection with the FoodRecognitionListener as the callback, on every frame analyzed you will receive a FoodCandidates object. This is the structure of the that data class
data class FoodCandidates(
    val detectedCandidates: List<DetectedCandidate>? = null,
    val logoCandidates: List<ObjectDetectionCandidate>? = null,
    val barcodeCandidates: List<BarcodeCandidate>? = null,
    val ocrCandidates: List<OCRCode>? = null
)
Depending on how you structured the FoodDetectionConfiguration object, some fields of the FoodCandidates object might be null. If the field is null it means that that type of detection has not been run. On the other hand, if the detection process ran to completion and the list is empty, then that type of detection could not recognize anything from the given frame.
In this section we will go over the result structure that comes as a result of the Food Detection process. Once you receive a callback from the FoodRecognitionListener be sure to check the detectedCandidates result.
DetectedCandidate
A DetectedCandidate represents the result from running Passio's neural network, specialized for detecting foods like apples, salads, burgers etc.
class DetectedCandidate(
    val passioID: PassioID,
    val confidence: Float,
    val boundingBox: RectF,
    val croppedImage: Bitmap?
)
Barcode Detection
Try to opt in for BARCODE by enabling the flag detectBarcodes and point your device to the image of the barcodes below. The SDK's barcode detector will recognize the barcode and it will return the barcode number inside the BarcodeCandidate object.
data class BarcodeCandidate(val barcode: Barcode, val boundingBox: RectF)
Use the barcode field to query the UPC database and if the scanned food can be found in Passio's database, a PassioIDAttributes object will be returned
PassioSDK.instance.fetchPassioIDAttributesForBarcode(barcode) { passioIDAttribute ->
    if (passioIDAttribute == null) {
        return@fetchPassioIDAttributesForBarcode
    }
    Toast.makeText(requestContext(), passioIDAttribute.name, Toast.LENGTH_SHORT).show()
}

Logo Detection
Logo detection uses the same process of Object Detection as was explained in the Visual section. The return object of Logo Detection is a ObjectDetectionCandidate. Opt in for Logo detection with DetectionOption.DetectionType.LOGO, read the logoCandidates and display them on the screen.
candidates.logoCandidates!!.forEach { candidate ->
    val foodName = PassioSDK.instance.lookupNameFor(candidate.passioID) ?: ""
    Toast.makeText(requestContext(), foodName, Toast.LENGTH_SHORT).show()
}

OCR
Passio uses OCR to recognize names of branded foods. Opt in with DetectionOption.DetectionType.OCR, and if the SDK has recognized a branded food that is present in Passio's Nutritional Database it will return the OCRCode of that food item. To retrieve full information about the item call
PassioSDK.instance.fetchPassioIDAttributesForOCRCode(candidates.ocrCandidate!!) { passioIDAttribute ->
    if (passioIDAttribute == null) {
        return@fetchPassioIDAttributesForOCRCode
    }
    Toast.makeText(requestContext(), passioIDAttribute.name, Toast.LENGTH_SHORT).show()
}

The FoodCandidate returns a list of VisualCandiates, which object should I choose to display to the user?
The Visual Detection process can detect up to 5 objects per frame. Depending on your UI/UX you can display all the results to the end user, or just choose one of them. The criteria to choose the best candidate from a list is up to you, but the two most common strategies are the biggest bounding box or the highest confidence. This biggest bounding box represents the biggest object on the frame and the highest confidence points to the object that the neural network is most sure about.
Once the food detection process has returned a PassioID, it is time to query the database and see what information we have on the detected food.
The most detailed information can be found in the PassioIDAttributes object. To retrieve this object from a given PassioID, simply call
val attributes = PassioSDK.instance.lookupPassioAttributesFor(passioID)
PassioIDAttributes
data class PassioIDAttributes(
    var passioID: PassioID,
    var name: String,
    var imageName: String,
    val entityType: PassioIDEntityType,
    var parents: List<PassioAlternative>?,
    var children: List<PassioAlternative>?,
    var siblings: List<PassioAlternative>?,
    val passioFoodItemDataForDefault: PassioFoodItemData?,
    val passioFoodRecipe: PassioFoodRecipe?,
    val condiments: List<PassioFoodItemData>? = null
)
Here we will cover the fields that are not self-explanatory:
- imageName - An identifier for the image of the food. To retrieve the Drawable for the given image name use
val drawable = lookupImageForFilename(context, imageName)
Image for a food can also be retrieved using the PassioID and the method
val drawable = lookupImageFor(context, passioID)
- parents, children, siblings - All the foods in Passio's Nutritional Database are organized in a tree-like structure with each PassioID being a node in that tree. Let's say we scanned a "mandarin". A child of a "mandarin" is a "tangerine", and its parent is a "whole citrus fruit". We can offer these alternatives to the user in case the user is pointing to a similar food to a mandarin.
- passioFoodItemDataForDefault, passioFoodRecipe - The SDK differentiates single food items and food recipes. A single item represents just one particular food like an apple or peas. A food recipe consists of more than one single food item. For example a recipe is a Caprese salad which consists of mozzarella, tomatoes, basil, salt, black pepper and olive oil.
PassioFoodItemData
data class PassioFoodItemData(
    var passioID: PassioID,
    var name: String,
    var imageName: String
) {
    var referenceWeight = UnitMass(Grams(), 0.0)
    var fat: Double?
    var satFat: Double?
    var monounsaturatedFat: Double?
    var polyunsaturatedFat: Double?
    var proteins: Double?
    var carbs: Double?
    var calories: Double?
    var saturatedFat: Double?
    var cholesterol: Double?
    var sodium: Double?
    var fibers: Double?
    var transFat: Double?
    var sugars: Double?
    var sugarsAdded: Double?
    var alcohol: Double?
    var iron: Double?
    var vitaminC: Double?
    var vitaminA: Double?
    var vitaminD: Double?
    var calcium: Double?
    var potassium: Double?
    var sugarAlcohol: Double?

    var servingSizes: List<PassioServingSize>
    var servingUnits: List<PassioServingUnit>
    var entityType: PassioIDEntityType
    var alternatives: List<PassioAlternative>?
}
PassioFoodItemData holds the nutritional information for a food item like calories, carbs, protein, fat etc. It also has a reference weight on which these values for calculated and contains serving sizes and serving units. Serving sizes offer you quick options to select the size of the food with a given quantity and unit.
PassioFoodRecipe
Recipes should be viewed as a collection of PassioFoodItemData objects.
data class PassioFoodRecipe(
    var passioID: PassioID,
    var name: String,
    var filenameIcon: String,
    var foodItems: MutableList<PassioFoodItemData>,
) {
	var servingSizes: List<PassioServingSize>
    var servingUnits: List<PassioServingUnit>
}
Other useful queries
If you have a PassioID returned from the detection process and you are just interested in the name of the corresponding food, use
fun lookupNameFor(passioID: PassioID): String?
On the other hand, you can also retrieve a PassioID from a name of a food
fun lookupPassioIDFor(name: String): PassioID?
To get a list of all the alternatives (children, siblings and parents) of a given PassioID use
fun lookupAlternativesFor(passioID: PassioID): List<PassioID>?
With every shipped version of the SDK there will also be a PassioSDKSandbox containing the latest files and showcasing the basic setup of an app using the SDK. In this section we will cover the architecture of the small app and all the calls to the SDK keeping in mind where they are located and when they are called.
The app consists of one MainActivity that holds 2 fragments: RecognizerFragment and PermissionFragment. The latter will be displayed to the user if they deny the access to the camera of the device. The RecognitionFragment is used to display the camera preview, start the recognition session and display the results through a view called FoodResultView.
PassioSDK library
The .aar file has already been imported as a separate module called passiolib-release. If you want to see how Android Studio structures the module, you can right-click on the passiolib-release module in the project viewer and choose option "Reveal in Finder". The passiolib-release module has been added as a dependency to the app modules, where we will use the SDK.
Camera
As mentioned above, the camera preview will be used in the RecognizerFragment. If you follow that fragment's onCreateView method you will see that the fragment inflates the view hierarchy found in the file fragment_recognizer.xml. Located in that view hierarchy we have the CameraX's PreviewView with an ID of "recognizerPreviewView". Taking a look back to the RecognizerFragment we can see that this component implements the PassioCameraViewProvider interface. Also, in the fragment's onStart lifecycle callback we are calling the
PassioSDK.instance.startCamera(this)
to start the preview and link the camera to the SDK. We don't need to stop the camera on onStop because we are passing the LifecycleObserver reference to the startCamera method. The camera will stop automatically when it needs to.
SDK Initialization
The SDK is initialized and configured in the onCreate method in the MainActivity.
override fun onCreate(savedInstanceState: Bundle?) {
    super.onCreate(savedInstanceState)
    setContentView(R.layout.activity_main)
    ...
    PassioSDK.instance.configure(
        this,
        "",
        ::onPassioSDKError,
        ::onPassioSDKReady
    )
}
This configure method means that we are using the files located in the assets folder of the app module. Verify that there are 5 files in the assets folder with the extension .passiosecure.
Detection session
The session is defined in the onStart and onStop lifecycle callbacks of the RecognizerFragment.
override fun onStart() {
    super.onStart()
    ...
    PassioSDK.instance.startCamera(this)
    val detectionConfig = FoodDetectionConfiguration().apply {
        detectBarcodes = true
    }
    PassioSDK.instance.startFoodDetection(foodListener, detectionConfig)
}

override fun onStop() {
    PassioSDK.instance.stopFoodDetection()
    super.onStop()
}
As described in the section 5 "Food detection session" of this CodeLab, we define a FoodDetectionConfiguration object and through it opt in for FOOD and BARCODE detection. We then pass this object to the startFoodDetection to receive results through the foodListener. When this fragment's onStop is called we are stopping the food detection process to so that any results generated in the SDK after this point won't be delivered causing leaks.
private val foodListener = object : FoodRecognitionListener {
    override fun onRecognitionResults(candidates: FoodCandidates, image: Bitmap?, nutritionFacts: PassioNutritionFacts?) {
        val visualCandidates = candidates.detectedCandidates!!
        val barcodeCandidates = candidates.barcodeCandidates!!
        if (visualCandidates.isEmpty() && barcodeCandidates.isEmpty()) {
            recognizerFoodResultView.setSearching()
        } else if (barcodeCandidates.isNotEmpty()) {
            val bestBarcodeResult = barcodeCandidates.maxByOrNull { it.boundingBox.width() * it.boundingBox.height() } ?: return
            recognizerFoodResultView.setBarcodeResult(bestBarcodeResult.barcode)
        } else {
            val bestVisualCandidate = visualCandidates.maxByOrNull { it.confidence } ?: return
            recognizerFoodResultView.setFoodResult(bestVisualCandidate.passioID)
        }
    }
The foodListner above only takes into account the candidates from the detectedCandidates and barcodeCandidate lists because we only opted in for FOOD and BARCODE detection. The other files of the candidates object received in the onRecognitionResults method will be null. Depending on the candidates within these two lists we will change the state of the FoodResultView denoted as recognizerFoodResultView.
Taking a closer look at the FoodResultView we can see how to get food details such as the name or the icon depending on the source of the detection. If the passioID comes from the FOOD detection we can obtain the PassioIDAttributs through the
PassioSDK.instance.lookupPassioAttributesFor(passioID)
On the other hand, if the results comes from the BARCODE detection, we can get the PassioIDAttributes from the networking call
PassioSDK.instance.fetchPassioIDAttributesForBarcode(barcode) { passioIDAttributes ->
    ...
}
For more information about the data structures of the detection results and the database queries, take a look at sections 6 and 8.